Cosmos Synthetic Data Generation — Isaac Sim Documentation
Title: Cosmos Synthetic Data Generation — Isaac Sim Documentation
URL Source: https://docs.isaacsim.omniverse.nvidia.com/latest/replicator_tutorials/tutorial_replicator_cosmos.html
Published Time: Tue, 21 Oct 2025 19:25:24 GMT
Markdown Content: Cosmos Synthetic Data Generation#
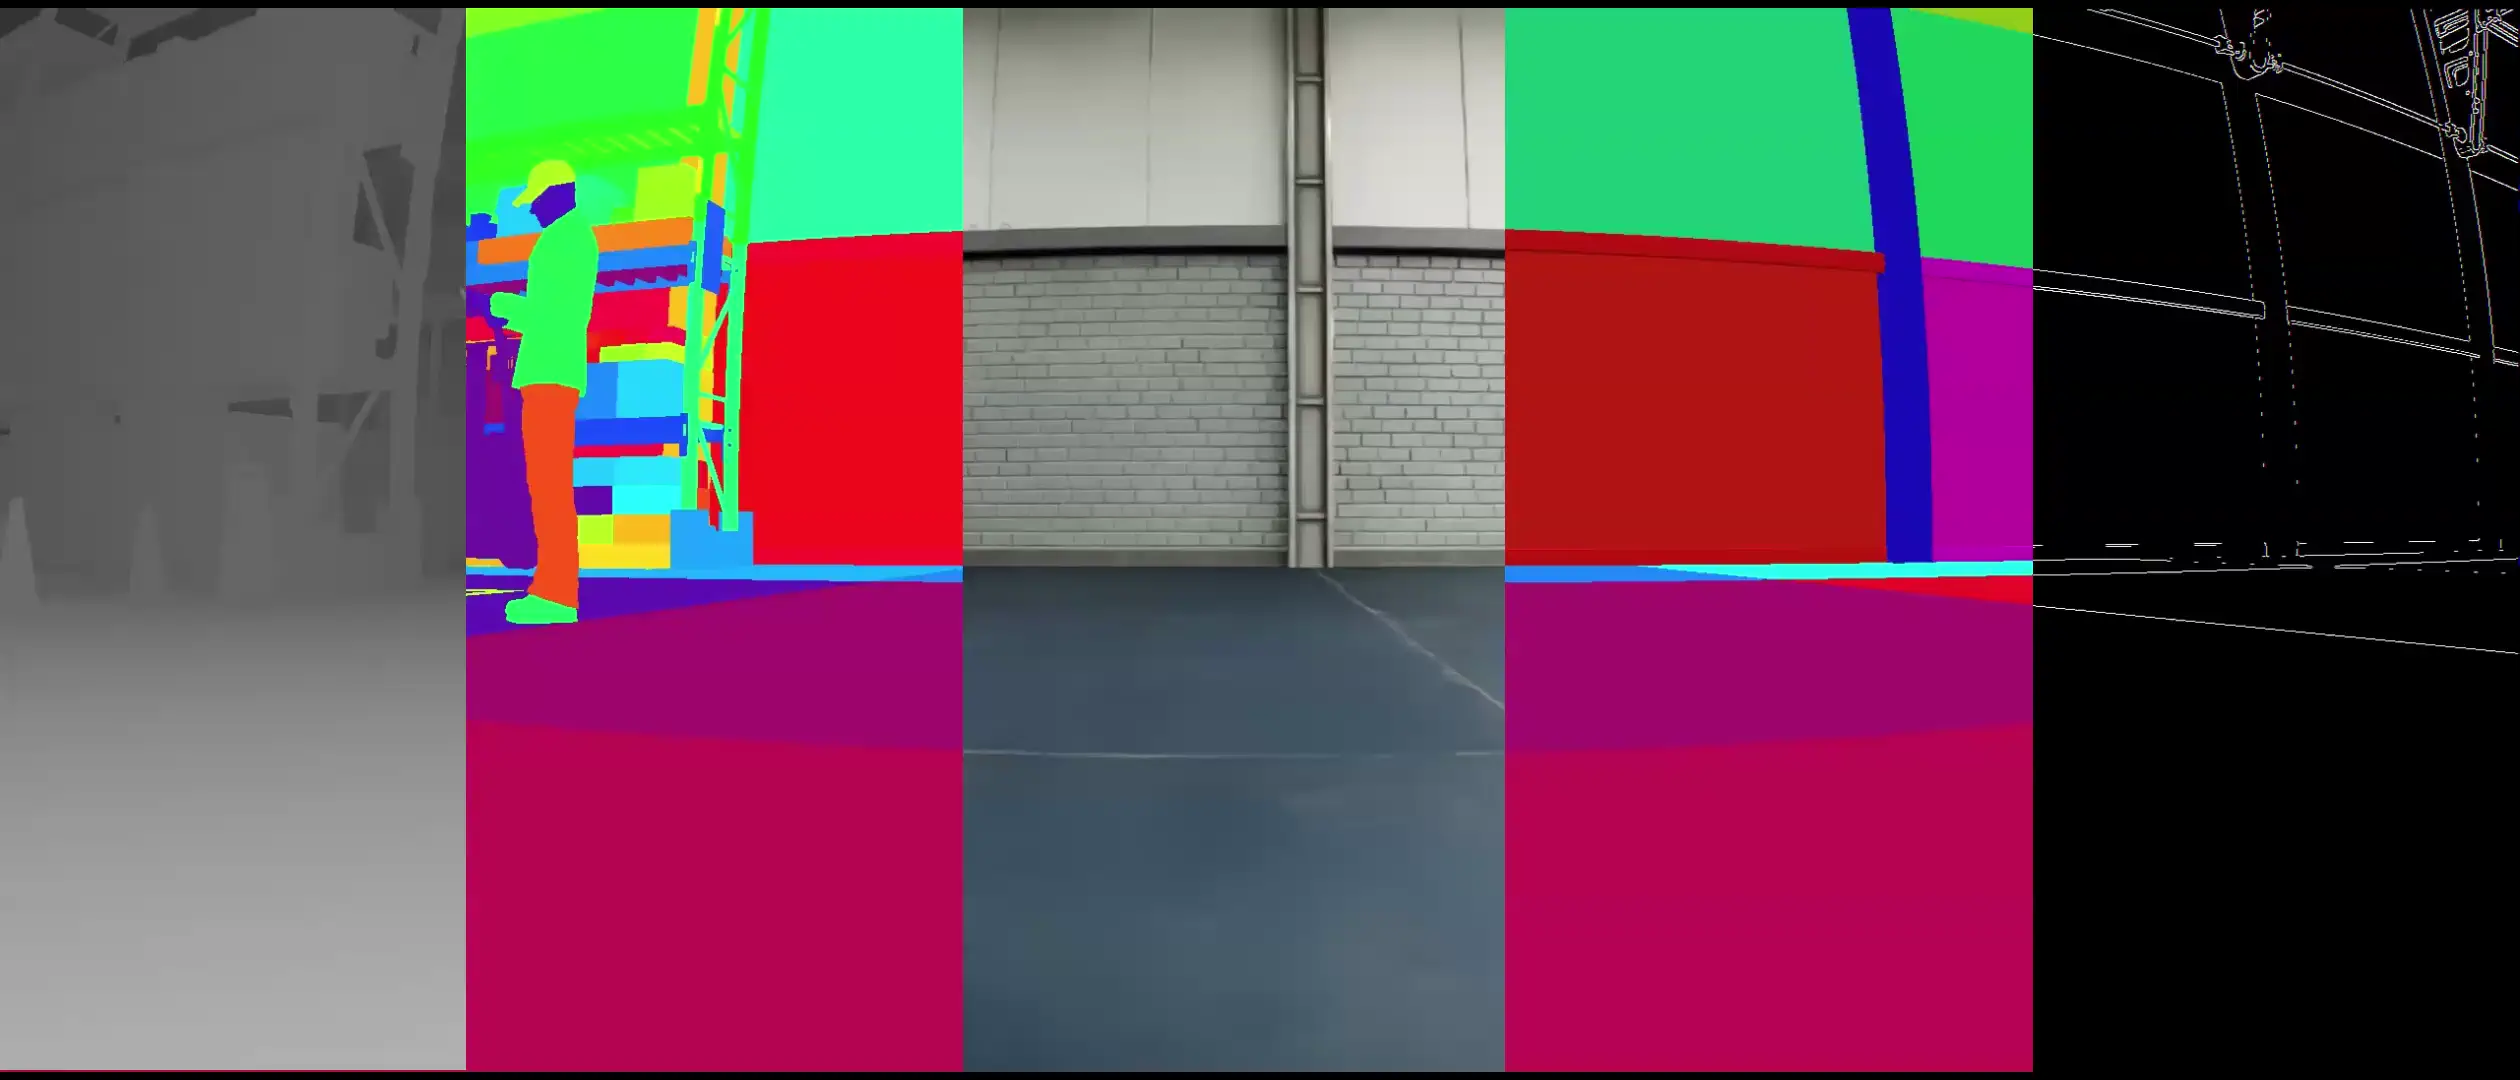
This tutorial demonstrates generating multi-modal synthetic data for NVIDIA Cosmos using the CosmosWriter in Isaac Sim. The writer captures synchronized RGB, depth, segmentation, and edge data from a robot navigating a warehouse environment.
The generated data serves as ground truth input for Cosmos Transfer, which transforms low-resolution control signals into high-quality visual simulations through its Multi-ControlNet architecture.
 Prerequisites#
-
Familiarity with the omni.replicator extension and its writers
-
Basic understanding of Isaac Sim’s SDG Getting Started Scripts
-
Running simulations as Standalone Applications or via the Script Editor.
What the CosmosWriter Generates#
The writer outputs five synchronized modalities from the robot’s camera:
-
RGB - Color imagery (vis control)
-
Depth - Distance-to-camera for spatial understanding
-
Segmentation - Instance masks for object tracking
-
Shaded Segmentation - Instance masks with realistic shading
-
Edges - Canny edge detection for boundaries
These modalities correspond to Cosmos Transfer’s control branches:
-
vis: Uses RGB imagery with bilateral blurring
-
edge: Applies Canny edge detection (tunable thresholds)
-
depth: Depth maps for 3D structure understanding
-
seg: Segmentation masks for object identification
Each control branch can be weighted (0.0-1.0) to balance adherence vs. creative freedom in the generated output.
Implementation#
This example demonstrates a Carter Nova robot autonomously navigating through a warehouse environment. As the robot moves from its starting position to a target location, the CosmosWriter captures synchronized multi-modal data (RGB, depth, segmentation, shaded segmentation, and edges) from the robot’s front camera. The captured data is organized into clips, with each clip containing a sequence of frames that can be used as input for Cosmos Transfer.
Standalone Application
The example can be run as a standalone application using the following commands in the terminal (on Windows use python.bat instead of python.sh):
./python.sh standalone_examples/api/isaacsim.replicator.examples/cosmos_writer_warehouse.py
from isaacsim import SimulationApp
simulation_app = SimulationApp(launch_config={"headless": False})
import os
import carb import omni.replicator.core as rep import omni.timeline import omni.usd from isaacsim.core.utils.stage import add_reference_to_stage from isaacsim.storage.native import get_assets_root_path from pxr import UsdGeom
Capture parameters
START_DELAY = 0.1 # Timeline duration delay before capturing the first clip NUM_CLIPS = 2 # Number of video clips to capture with the CosmosWriter NUM_FRAMES_PER_CLIP = 10 # Number of frames for each clip CAPTURE_INTERVAL = 2 # Capture interval between frames (capture every N simulation steps)
Stage and asset paths
STAGE_URL = "/Isaac/Samples/Replicator/Stage/full_warehouse_worker_and_anim_cameras.usd" CARTER_NAV_ASSET_URL = "/Isaac/Samples/Replicator/OmniGraph/nova_carter_nav_only.usd" CARTER_NAV_PATH = "/NavWorld/CarterNav" CARTER_NAV_TARGET_PATH = f"{CARTER_NAV_PATH}/targetXform" CARTER_CAMERA_PATH = f"{CARTER_NAV_PATH}/chassis_link/sensors/front_hawk/left/camera_left" CARTER_NAV_POSITION = (-6, 4, 0) CARTER_NAV_TARGET_POSITION = (3, 3, 0)
def advance_timeline_by_duration(duration: float, max_updates: int = 1000): timeline = omni.timeline.get_timeline_interface() current_time = timeline.get_current_time() target_time = current_time + duration
if timeline.get_end_time() < target_time:
    timeline.set_end_time(1000000)

if not timeline.is_playing():
    timeline.play()

print(f"Advancing timeline from {current_time:.4f}s to {target_time:.4f}s")
step_count = 0
while current_time < target_time:
    if step_count >= max_updates:
        print(f"Max updates reached: {step_count}, finishing timeline advance.")
        break

    prev_time = current_time
    simulation_app.update()
    current_time = timeline.get_current_time()
    step_count += 1

    if step_count % 10 == 0:
        print(f"\tStep {step_count}, {current_time:.4f}s/{target_time:.4f}s")

    if current_time <= prev_time:
        print(f"Warning: Timeline did not advance at update {step_count} (time: {current_time:.4f}s).")
print(f"Finished advancing timeline to {timeline.get_end_time():.4f}s in {step_count} steps")
def run_sdg_pipeline( camera_path, num_clips, num_frames_per_clip, capture_interval, use_instance_id=True, segmentation_mapping=None ): rp = rep.create.render_product(camera_path, (1280, 720)) cosmos_writer = rep.WriterRegistry.get("CosmosWriter") backend = rep.backends.get("DiskBackend") out_dir = os.path.join(os.getcwd(), f"_out_cosmos_warehouse") print(f"output_directory: {out_dir}") backend.initialize(output_dir=out_dir) cosmos_writer.initialize( backend=backend, use_instance_id=use_instance_id, segmentation_mapping=segmentation_mapping ) cosmos_writer.attach(rp)
# Make sure the timeline is playing
timeline = omni.timeline.get_timeline_interface()
if not timeline.is_playing():
    timeline.play()

print(
    f"Starting SDG pipeline. Capturing {num_clips} clips with {num_frames_per_clip} frames each, every {capture_interval} simulation step(s)."
)

for clip_index in range(num_clips):
    print(f"Starting clip {clip_index + 1}/{num_clips}")

    frames_captured_count = 0
    simulation_step_index = 0
    while frames_captured_count < num_frames_per_clip:
        print(f"Simulation step {simulation_step_index}")
        if simulation_step_index % capture_interval == 0:
            print(f"\t Capturing frame {frames_captured_count + 1}/{num_frames_per_clip} for clip {clip_index + 1}")
            rep.orchestrator.step(pause_timeline=False)
            frames_captured_count += 1
        else:
            simulation_app.update()
        simulation_step_index += 1

    print(f"Finished clip {clip_index + 1}/{num_clips}. Captured {frames_captured_count} frames")

    # Move to next clip if not the last clip
    if clip_index < num_clips - 1:
        print(f"Moving to next clip...")
        cosmos_writer.next_clip()

print("Waiting to finish processing and writing the data")
rep.orchestrator.wait_until_complete()
print(f"Finished SDG pipeline. Captured {num_clips} clips with {num_frames_per_clip} frames each")
cosmos_writer.detach()
rp.destroy()
timeline.pause()
def run_example( num_clips, num_frames_per_clip, capture_interval, start_delay=0.0, use_instance_id=True, segmentation_mapping=None, ): assets_root_path = get_assets_root_path() stage_path = assets_root_path + STAGE_URL print(f"Opening stage: '{stage_path}'") omni.usd.get_context().open_stage(stage_path) stage = omni.usd.get_context().get_stage()
# Enable script nodes
carb.settings.get_settings().set_bool("/app/omni.graph.scriptnode/opt_in", True)

# Disable capture on play on the new stage, data is captured manually using the step function
rep.orchestrator.set_capture_on_play(False)

# Set DLSS to Quality mode (2) for best SDG results (Options: 0 (Performance), 1 (Balanced), 2 (Quality), 3 (Auto)
carb.settings.get_settings().set("rtx/post/dlss/execMode", 2)

# Load carter nova asset with its navigation graph
carter_url_path = assets_root_path + CARTER_NAV_ASSET_URL
print(f"Loading carter nova asset: '{carter_url_path}' at prim path: '{CARTER_NAV_PATH}'")
carter_nav_prim = add_reference_to_stage(usd_path=carter_url_path, prim_path=CARTER_NAV_PATH)

if not carter_nav_prim.GetAttribute("xformOp:translate"):
    UsdGeom.Xformable(carter_nav_prim).AddTranslateOp()
carter_nav_prim.GetAttribute("xformOp:translate").Set(CARTER_NAV_POSITION)

# Set the navigation target position
carter_navigation_target_prim = stage.GetPrimAtPath(CARTER_NAV_TARGET_PATH)
if not carter_navigation_target_prim.IsValid():
    print(f"Carter navigation target prim not found at path: {CARTER_NAV_TARGET_PATH}, exiting")
    return
if not carter_navigation_target_prim.GetAttribute("xformOp:translate"):
    UsdGeom.Xformable(carter_navigation_target_prim).AddTranslateOp()
carter_navigation_target_prim.GetAttribute("xformOp:translate").Set(CARTER_NAV_TARGET_POSITION)

# Use the carter nova front hawk camera for capturing data
camera_prim = stage.GetPrimAtPath(CARTER_CAMERA_PATH)
if not camera_prim.IsValid():
    print(f"Camera prim not found at path: {CARTER_CAMERA_PATH}, exiting")
    return

# Advance the timeline with the start delay if provided
if start_delay is not None and start_delay > 0:
    advance_timeline_by_duration(start_delay)

# Run the SDG pipeline
run_sdg_pipeline(
    camera_prim.GetPath(), num_clips, num_frames_per_clip, capture_interval, use_instance_id, segmentation_mapping
)
Setup the environment and run the example
run_example( num_clips=NUM_CLIPS, num_frames_per_clip=NUM_FRAMES_PER_CLIP, capture_interval=CAPTURE_INTERVAL, start_delay=START_DELAY, use_instance_id=True, )
simulation_app.close()
Script Editor
import asyncio import os
import carb import omni.replicator.core as rep import omni.timeline import omni.usd from isaacsim.core.utils.stage import add_reference_to_stage from isaacsim.storage.native import get_assets_root_path_async from pxr import UsdGeom
Capture parameters
START_DELAY = 0.1 # Timeline duration delay before capturing the first clip NUM_CLIPS = 3 # Number of video clips to capture with the CosmosWriter NUM_FRAMES_PER_CLIP = 120 # Number of frames for each clip CAPTURE_INTERVAL = 2 # Capture interval between frames (capture every N simulation steps)
Stage and asset paths
STAGE_URL = "/Isaac/Samples/Replicator/Stage/full_warehouse_worker_and_anim_cameras.usd" CARTER_NAV_ASSET_URL = "/Isaac/Samples/Replicator/OmniGraph/nova_carter_nav_only.usd" CARTER_NAV_PATH = "/NavWorld/CarterNav" CARTER_NAV_TARGET_PATH = f"{CARTER_NAV_PATH}/targetXform" CARTER_CAMERA_PATH = f"{CARTER_NAV_PATH}/chassis_link/sensors/front_hawk/left/camera_left" CARTER_NAV_POSITION = (-6, 4, 0) CARTER_NAV_TARGET_POSITION = (3, 3, 0)
async def advance_timeline_by_duration_async(duration: float, max_updates: int = 1000): timeline = omni.timeline.get_timeline_interface() current_time = timeline.get_current_time() target_time = current_time + duration
if timeline.get_end_time() < target_time:
    timeline.set_end_time(1000000)

if not timeline.is_playing():
    timeline.play()

print(f"Advancing timeline from {current_time:.4f}s to {target_time:.4f}s")
step_count = 0
while current_time < target_time:
    if step_count >= max_updates:
        print(f"Max updates reached: {step_count}, finishing timeline advance.")
        break

    prev_time = current_time
    await omni.kit.app.get_app().next_update_async()
    current_time = timeline.get_current_time()
    step_count += 1

    if step_count % 10 == 0:
        print(f"\tStep {step_count}, {current_time:.4f}s/{target_time:.4f}s")

    if current_time <= prev_time:
        print(f"Warning: Timeline did not advance at update {step_count} (time: {current_time:.4f}s).")
print(f"Finished advancing timeline to {timeline.get_end_time():.4f}s in {step_count} steps")
async def run_sdg_pipeline_async( camera_path, num_clips, num_frames_per_clip, capture_interval, use_instance_id=True, segmentation_mapping=None, ): rp = rep.create.render_product(camera_path, (1280, 720)) cosmos_writer = rep.WriterRegistry.get("CosmosWriter") backend = rep.backends.get("DiskBackend") out_dir = os.path.join(os.getcwd(), f"_out_cosmos_warehouse") print(f"output_directory: {out_dir}") backend.initialize(output_dir=out_dir) cosmos_writer.initialize( backend=backend, use_instance_id=use_instance_id, segmentation_mapping=segmentation_mapping ) cosmos_writer.attach(rp)
# Make sure the timeline is playing
timeline = omni.timeline.get_timeline_interface()
if not timeline.is_playing():
    timeline.play()

print(
    f"Starting SDG pipeline. Capturing {num_clips} clips with {num_frames_per_clip} frames each, every {capture_interval} simulation step(s)."
)

for clip_index in range(num_clips):
    print(f"Starting clip {clip_index + 1}/{num_clips}")

    frames_captured_count = 0
    simulation_step_index = 0
    while frames_captured_count < num_frames_per_clip:
        print(f"Simulation step {simulation_step_index}")
        if simulation_step_index % capture_interval == 0:
            print(
                f"\t Capturing frame {frames_captured_count + 1}/{num_frames_per_clip} for clip {clip_index + 1}"
            )
            await rep.orchestrator.step_async(pause_timeline=False)
            frames_captured_count += 1
        else:
            await omni.kit.app.get_app().next_update_async()
        simulation_step_index += 1

    print(f"Finished clip {clip_index + 1}/{num_clips}. Captured {frames_captured_count} frames")

    # Move to next clip if not the last clip
    if clip_index < num_clips - 1:
        print(f"Moving to next clip...")
        cosmos_writer.next_clip()

print("Waiting to finish processing and writing the data")
await rep.orchestrator.wait_until_complete_async()
print(f"Finished SDG pipeline. Captured {num_clips} clips with {num_frames_per_clip} frames each")
cosmos_writer.detach()
rp.destroy()
timeline.pause()
async def run_example_async( num_clips, num_frames_per_clip, capture_interval, start_delay=0.0, use_instance_id=True, segmentation_mapping=None, ): assets_root_path = await get_assets_root_path_async() stage_path = assets_root_path + STAGE_URL print(f"Opening stage: '{stage_path}'") omni.usd.get_context().open_stage(stage_path) stage = omni.usd.get_context().get_stage()
# Enable script nodes
carb.settings.get_settings().set_bool("/app/omni.graph.scriptnode/opt_in", True)

# Disable capture on play on the new stage, data is captured manually using the step function
rep.orchestrator.set_capture_on_play(False)

# Set DLSS to Quality mode (2) for best SDG results (Options: 0 (Performance), 1 (Balanced), 2 (Quality), 3 (Auto)
carb.settings.get_settings().set("rtx/post/dlss/execMode", 2)

# Load carter nova asset with its navigation graph
carter_url_path = assets_root_path + CARTER_NAV_ASSET_URL
print(f"Loading carter nova asset: '{carter_url_path}' at prim path: '{CARTER_NAV_PATH}'")
carter_nav_prim = add_reference_to_stage(usd_path=carter_url_path, prim_path=CARTER_NAV_PATH)

if not carter_nav_prim.GetAttribute("xformOp:translate"):
    UsdGeom.Xformable(carter_nav_prim).AddTranslateOp()
carter_nav_prim.GetAttribute("xformOp:translate").Set(CARTER_NAV_POSITION)

# Set the navigation target position
carter_navigation_target_prim = stage.GetPrimAtPath(CARTER_NAV_TARGET_PATH)
if not carter_navigation_target_prim.IsValid():
    print(f"Carter navigation target prim not found at path: {CARTER_NAV_TARGET_PATH}, exiting")
    return
if not carter_navigation_target_prim.GetAttribute("xformOp:translate"):
    UsdGeom.Xformable(carter_navigation_target_prim).AddTranslateOp()
carter_navigation_target_prim.GetAttribute("xformOp:translate").Set(CARTER_NAV_TARGET_POSITION)

# Use the carter nova front hawk camera for capturing data
camera_prim = stage.GetPrimAtPath(CARTER_CAMERA_PATH)
if not camera_prim.IsValid():
    print(f"Camera prim not found at path: {CARTER_CAMERA_PATH}, exiting")
    return

# Advance the timeline with the start delay if provided
if start_delay is not None and start_delay > 0:
    await advance_timeline_by_duration_async(start_delay)

# Run the SDG pipeline
await run_sdg_pipeline_async(
    camera_prim.GetPath(),
    num_clips,
    num_frames_per_clip,
    capture_interval,
    use_instance_id,
    segmentation_mapping,
)
Setup the environment and run the example
asyncio.ensure_future(run_example_async( num_clips=NUM_CLIPS, num_frames_per_clip=NUM_FRAMES_PER_CLIP, capture_interval=CAPTURE_INTERVAL, start_delay=START_DELAY, use_instance_id=True, ))
Code Explanation
This tab explains how the warehouse navigation example works and how the CosmosWriter captures multi-modal data during robot movement.
Script Overview
The script simulates a Carter Nova robot navigating through a warehouse while capturing synchronized multi-modal data from its front camera. The robot moves from a starting position to a target location, and the CosmosWriter generates ground truth data for Cosmos Transfer.
Main Execution Flow
Load warehouse environment
stage_path = assets_root_path + STAGE_URL omni.usd.get_context().open_stage(stage_path)
Add Carter Nova robot with navigation
carter_nav_prim = add_reference_to_stage(usd_path=carter_url_path, prim_path=CARTER_NAV_PATH) carter_nav_prim.GetAttribute("xformOp:translate").Set(CARTER_NAV_POSITION)
Set navigation target
carter_navigation_target_prim.GetAttribute("xformOp:translate").Set(CARTER_NAV_TARGET_POSITION)
Run SDG pipeline
run_sdg_pipeline(camera_path, num_clips, num_frames_per_clip, capture_interval)
Key Configuration Parameters
Capture Parameters
-
NUM_CLIPS = 2: Generate 2 separate video clips -
NUM_FRAMES_PER_CLIP = 10: Each clip contains 10 frames -
CAPTURE_INTERVAL = 2: Capture every 2nd simulation step -
START_DELAY = 0.1: Custom delay to start capturing at a specific time
Data Capture Pipeline
The run_sdg_pipeline function orchestrates the entire capture process:
SDG Pipeline Implementation
def run_sdg_pipeline(camera_path, num_clips, num_frames_per_clip, capture_interval, use_instance_id=True): # Create render product from robot's camera rp = rep.create.render_product(camera_path, (1280, 720))
# Initialize CosmosWriter
cosmos_writer = rep.WriterRegistry.get("CosmosWriter")
backend = rep.backends.get("DiskBackend")
backend.initialize(output_dir="_out_cosmos_warehouse")
cosmos_writer.initialize(backend=backend, use_instance_id=use_instance_id)
cosmos_writer.attach(rp)

# Capture multiple clips
for clip_index in range(num_clips):
    # Capture frames for current clip
    frames_captured_count = 0
    while frames_captured_count < num_frames_per_clip:
        if simulation_step_index % capture_interval == 0:
            rep.orchestrator.step(pause_timeline=False)
            frames_captured_count += 1
        else:
            simulation_app.update()

    # Move to next clip
    if clip_index < num_clips - 1:
        cosmos_writer.next_clip()
Key aspects: - The render product is created from the robot’s front camera at 1280x720 resolution - pause_timeline=False allows the robot to continue moving during capture - The simulation advances between captures to show navigation progress
CosmosWriter Configuration
Writer Modes and Parameters The CosmosWriter supports two segmentation modes:
- Instance ID Mode (default):
cosmos_writer.initialize( backend=backend, use_instance_id=True, # Automatic object tracking segmentation_mapping=None # No semantic labels needed ) 2. Semantic Segmentation Mode:
segmentation_mapping = { "floor": [255, 0, 0, 255], "rack": [0, 255, 0, 255] } cosmos_writer.initialize( backend=backend, segmentation_mapping=segmentation_mapping # Overrides instance ID )
Timeline Management
The script uses a helper function to advance the timeline before starting capture:
Timeline Advancement
def advance_timeline_by_duration(duration: float, max_updates: int = 1000): timeline = omni.timeline.get_timeline_interface() current_time = timeline.get_current_time() target_time = current_time + duration
while current_time < target_time:
    simulation_app.update()
    current_time = timeline.get_current_time()
This ensures the scene is fully initialized and the robot begins moving before data capture starts.
Output Structure#
The CosmosWriter generates organized multi-modal data optimized for Cosmos Transfer. Each clip represents a continuous sequence of frames captured during robot navigation:
_out_cosmos_warehouse/ clip_0000/ # First clip sequence rgb/ # Standard color images rgb_0000.png, rgb_0001.png, ... depth/ # Colorized depth visualization depth_0000.png, depth_0001.png, ... segmentation/ # Instance/semantic masks segmentation_0000.png, segmentation_0001.png, ... shaded_seg/ # Segmentation with realistic shading shaded_seg_0000.png, shaded_seg_0001.png, ... edges/ # Canny edge detection results edges_0000.png, edges_0001.png, ... rgb.mp4 # Combined RGB video depth.mp4 # Combined depth video segmentation.mp4 # Combined segmentation video shaded_seg.mp4 # Combined shaded segmentation video edges.mp4 # Combined edges video clip_0001/ # Next clip sequence
Advanced Usage#
Custom Segmentation Colors:
Map specific semantic labels to custom colors when you need consistent class identification across datasets. Use this when training models that require specific object classes to maintain the same color/ID across all training data, ensuring Cosmos Transfer preserves class relationships.
segmentation_mapping = { "floor": [255, 0, 0, 255], # Red "wall": [0, 255, 0, 255], # Green "rack": [0, 0, 255, 255] # Blue }
Note: This overrides instance ID mode and requires semantic annotations
cosmos_writer.initialize( backend=backend, segmentation_mapping=segmentation_mapping )
Edge Detection Tuning:
Adjust Canny edge detection parameters for the hysteresis procedure when generating edge maps. The Canny algorithm uses two thresholds:
-
Low threshold: Edges with gradient magnitude above this value are considered as potential edges
-
High threshold: Edges with gradient magnitude above this value are definitely edges
Lower threshold values detect more edges (including noise), while higher values produce cleaner output with only strong edges. Values typically range from 10-200.
cosmos_writer.initialize( backend=backend, use_instance_id=True, canny_threshold_low=10, # Low threshold for hysteresis canny_threshold_high=100 # High threshold for hysteresis )
Using Data with Cosmos Transfer#
The generated data can be used with Cosmos Transfer to create high-quality visual simulations. Here’s how the modalities map to Transfer’s control branches:
Basic Single Control Example:
{ "prompt": "A modern warehouse with autonomous robots...", "input_video_path": "_out_cosmos_warehouse/clip_0000/rgb.mp4", "edge": { "control_weight": 1.0 } }
Multi-Modal Control Example:
{ "prompt": "High-quality warehouse simulation...", "input_video_path": "_out_cosmos_warehouse/clip_0000/rgb.mp4", "vis": {"control_weight": 0.25}, "edge": {"control_weight": 0.25}, "depth": { "input_control": "_out_cosmos_warehouse/clip_0000/depth.mp4", "control_weight": 0.25 }, "seg": { "input_control": "_out_cosmos_warehouse/clip_0000/segmentation.mp4", "control_weight": 0.25 } }
Key Considerations:
-
Control Weights: Values 0.0-1.0 control adherence (higher = stricter following, lower = more creative freedom)
-
Automatic Normalization: If total weights > 1.0, they’re normalized automatically
-
Prompting: Focus on single scenes with rich descriptions; avoid camera control instructions
-
Safety: Human faces are automatically blurred by Cosmos Guardrail
For advanced features like spatiotemporal control maps and prompt upsampling, refer to the Cosmos Transfer documentation.
Summary#
This tutorial demonstrated using the CosmosWriter to generate synchronized multi-modal data from a robot navigating a warehouse. The output provides ground truth for Cosmos Transfer to create high-quality visual simulations for physical AI applications.
Links/Buttons:
- Skip to main content
- Isaac Sim Documentation
- 5.1.0
- 5.0.0
- 4.5.0
- 4.2.0
- discord
- github
- youtube
- www
- twitch
- Release Notes
- Known Issues
- Installation
- Quick Install
- Isaac Sim Requirements
- Download Isaac Sim
- Workstation Installation
- Container Installation
- Cloud Deployment
- NVIDIA Brev Deployment
- AWS Deployment
- Azure Deployment
- Google Cloud Deployment
- Tencent Cloud Deployment
- Alibaba Cloud Deployment
- Volcano Engine Deployment
- Baidu Cloud Deployment
- Remote Workstation Deployment
- Livestream Clients
- Python Environment Installation
- ROS 2 Installation
- Setup Tips
- Help & FAQ
- Isaac Sim Developer Resources
- Omniverse Feedback and Forums
- General Feedback
- Documentation Fix Request
- FAQ
- Troubleshooting
- Isaac Lab Troubleshooting
- ROS 2 Troubleshooting
- Replicator Troubleshooting
- Robot Setup Troubleshooting
- Digital Twin Troubleshooting
- Isaac Sim Assets
- Robot Assets
- Camera and Depth Sensors
- Non-Visual Sensors
- Prop Assets
- Environment Assets
- Featured Assets
- Nova Carter
- Third-Party SimReady USD Assets
- Neural Volume Rendering
- Quick Tutorials
- Isaac Sim Basic Usage Tutorial
- Basic Robot Tutorial
- Tutorial Reference Table
- Examples
- Interactive Examples Reference Table
- Standalone Examples Reference List
- Reference Architecture and Task Groupings
- Workflows
- User Interface Reference
- Keyboard Shortcuts Reference
- Asset Structure
- Isaac Lab
- Deploying Policies in Isaac Sim
- Running a Reinforcement Learning Policy through ROS 2 and Isaac Sim
- Getting Started with Cloner
- Instanceable Assets
- ROS 2
- ROS 2 Tutorials (Linux and Windows)
- URDF Import: Turtlebot
- Driving TurtleBot using ROS 2 Messages
- ROS 2 Clock
- ROS 2 Publish Real Time Factor (RTF)
- ROS 2 Cameras
- Add Noise to Camera
- Publishing Camera’s Data
- RTX Lidar Sensors
- ROS2 Transform Trees and Odometry
- ROS2 Setting Publish Rates
- ROS 2 Quality of Service (QoS)
- ROS2 Joint Control: Extension Python Scripting
- NameOverride Attribute
- ROS 2 Ackermann Controller
- Automatic ROS 2 Namespace Generation
- ROS 2 Bridge in Standalone Workflow
- ROS 2 Navigation
- Multiple Robot ROS2 Navigation
- ROS 2 Navigation with Block World Generator
- MoveIt 2
- ROS 2 Generic Publisher and Subscriber
- ROS 2 Generic Server and Client
- ROS 2 Service for Manipulating Prims Attributes
- ROS 2 Python Custom Messages
- ROS 2 Python Custom OmniGraph Node
- ROS 2 Custom C++ OmniGraph Node
- ROS 2 Launch
- ROS2 Simulation Control
- NVIDIA Isaac ROS
- ROS 2 Reference Architecture
- URDF Importer Extension
- USD to URDF Exporter Extension
- Synthetic Data Generation
- Perception Data Generation (Replicator)
- Overview
- Synthetic Data Recorder
- Getting Started Scripts
- Scene Based Synthetic Dataset Generation
- Object Based Synthetic Dataset Generation
- Environment Based Synthetic Dataset Generation with Infinigen
- Randomization in Simulation – AMR Navigation
- Randomization in Simulation – UR10 Palletizing
- Cosmos Synthetic Data Generation
- Data Augmentation
- Custom Replicator Randomization Nodes
- Modular Behavior Scripting
- Randomization Snippets
- Useful Snippets
- Online Generation
- Pose Estimation Synthetic Data Generation
- Training Pose Estimation Model with Synthetic Data
- Scene Generation with SceneBlox
- Action and Event Data Generation
- Actor Simulation and Synthetic Data Generation
- Actor Control
- Camera Control
- Writer Control
- Customization
- Object Simulation and Synthetic Data Generation
- Setting
- Mutable
- Camera
- Geometry
- Light
- Mutable Attribute
- Transformation
- Harmonizer
- Macro
- Distribution Visualizer
- Randomization Dependency: Incremental Examples
- VLM Scene Captioning
- Physical Space Event Generation
- RTX Sensors Placement and Calibration
- Camera Placement
- Camera Calibration
- Grasping Synthetic Data Generation
- Data Generation with MobilityGen
- Digital Twin
- Warehouse Creator Extension
- Conveyor Belt Utility
- Static Warehouse Assets
- NVIDIA cuOpt
- Isaac Cortex: Overview
- Decider networks
- Behavior Examples: Peck Games
- Walkthrough: Franka Block Stacking
- Walkthrough: UR10 Bin Stacking
- Building Cortex Based Extensions
- Mapping
- Application Template
- Development Tools
- Visual Studio Code (VS Code)
- Jupyter Notebook
- Omniverse Script Editor
- Modify Carb Settings
- Python Scripting and Tutorials
- Python Scripting Concepts
- Core API Overview
- Python Environment
- Scene Setup Snippets
- Util Snippets
- Robot Simulation Snippets
- API Documentation
- Core API Tutorial Series
- Hello World
- Hello Robot
- Adding a Controller
- Adding a Manipulator Robot
- Adding Multiple Robots
- Multiple Tasks
- Adding Props
- Data Logging
- GUI Reference
- Isaac Sim App Selector
- Create Menu
- Replicator Menu
- Preferences
- Selection Modes
- Omnigraph
- OmniGraph Interface
- OmniGraph Core Concepts
- Commonly Used Omnigraph Shortcuts
- Custom Python Nodes
- Custom C++ Nodes
- Additional Resources
- Basic OmniGraph Tutorial
- Isaac Sim Omnigraph Tutorial
- OmniGraph via Python Scripting Tutorial
- Importers and Exporters
- MJCF Importer Extension
- Onshape importer
- CAD Converter
- ShapeNet Importer
- Formats
- Importer and Exporter Tutorials Series
- Tutorial: Import URDF
- Tutorial: Export URDF
- Tutorial: Import MJCF
- Tutorial: ShapeNet Importer
- Robot Setup
- Robot Wizard [Beta]
- Robot Wizard Tutorial
- Editor Tools
- Merge Mesh Utility
- Gain Tuner Extension
- Robot Assembler
- Robot Setup Tutorials Series
- Tutorial 1: Stage Setup
- Tutorial 2: Assemble a Simple Robot
- Tutorial 3: Articulate a Basic Robot
- Tutorial 4: Add Camera and Sensors to a Robot
- Tutorial 5: Rig a Mobile Robot
- Tutorial 6: Setup a Manipulator
- Tutorial 7: Configure a Manipulator
- Tutorial 8: Generate Robot Configuration File
- Tutorial 9: Pick and Place Example
- Tutorial 10: Rig Closed-Loop Structures
- Tutorial 11: Tuning Joint Drive Gains
- Tutorial 12: Asset Optimization
- Tutorial 13: Rigging a Legged Robot for Locomotion Policy
- Asset Validation
- Robot Simulation
- Articulation Controller
- Mobile Robot Controllers
- Motion Generation
- Motion Generation Extension API Documentation
- Kinematics Solvers
- Trajectory Generation
- Path Planner Algorithm
- Lula RRT
- Motion Policy Algorithm
- RMPflow
- RMPflow Tuning Guide
- Lula Robot Description and XRDF Editor
- Lula RMPflow
- Lula Kinematics Solver
- Lula Trajectory Generator
- Configuring RMPflow for a New Manipulator
- cuRobo and cuMotion
- Surface Gripper Extension
- Grasp Editor
- Reinforcement Learning Policies Examples in Isaac Sim
- Robot Simulation Tips
- Useful Links
- Sensors
- Camera Sensors
- Depth Sensors
- RTX Sensors
- RTX Lidar Sensor
- RTX Sensor Non-Visual Materials
- RTX Radar Sensor
- RTX Sensor Annotators
- Physics-Based Sensors
- Articulation Joint Sensors
- Contact Sensor
- Effort Sensor
- IMU Sensor
- Proximity Sensor
- PhysX SDK Sensors
- PhysX SDK Generic Sensor
- PhysX SDK Lidar
- PhysX SDK Lightbeam Sensor
- Physics
- Physics Simulation Fundamentals
- Omniverse™ Physics and PhysX SDK Limitations
- Physics Simulation Management
- Physics Inspector
- Physics Static Collision Extension
- Simulation Data Visualizer
- Physics Debug Window
- Browsers
- Content Browser
- Isaac Sim Asset Browser [Beta]
- Material Browser
- NVIDIA Asset Browser
- SimReady Explorer
- Templates
- Custom Interactive Examples
- Extension Template Generator
- Extension Template Generator Explained
- Custom Extensions: C++
- Advanced Extension Template Generator from VS Code
- Debugging & Profiling
- Debug Drawing Extension API
- Omniverse Commands Tool Extension
- Debugging With Visual Studio Code
- Profiling Performance Using Tracy
- Adding and Updating Extensions Guide
- Community Project Highlights
- Glossary
- Isaac Sim Conventions
- Isaac Sim Performance Optimization Handbook
- Isaac Sim Benchmarks
- Renaming Extensions in Isaac Sim 4.5
- Omniverse and USD
- OpenUSD Fundamentals
- Working with USD
- USD Tools
- Robot Schema
- Commands
- Data Collection & Usage
- Licenses
- Isaac Sim License
- Isaac Sim Additional Software and Materials License
- Isaac Sim WebRTC Streaming Client License
- Omniverse License
- Licensing Disclaimer
- Other Licenses
- Redistributable Omniverse Software
- #
- NVIDIA Cosmos
- Cosmos Transfer
- omni.replicator
- writers
- Standalone Applications
- Script Editor
- Cosmos Transfer’s