Setup Tips — Isaac Sim Documentation
Title: Setup Tips — Isaac Sim Documentation
URL Source: https://docs.isaacsim.omniverse.nvidia.com/latest/installation/install_faq.html
Published Time: Tue, 21 Oct 2025 19:24:38 GMT
Markdown Content: Setup Tips#
This is a mini-windowed app that will help run any of the modes below.
Isaac Sim Full App
This is the main windowed Isaac Sim application.
It is the first option and default mode to run from the Isaac Sim App Selector.
This mode includes all Isaac Sim extensions and most of them are enabled by default.
Isaac Sim Full Streaming App (via Isaac Sim WebRTC Streaming Client)
This is a headless version of Isaac Sim. It can be run remotely on a workstation with an RTX GPU and accessed from the Isaac Sim WebRTC Streaming Client app available for Linux, Windows and macOS.
This mode includes all Isaac Sim extensions and most of them are enabled by default.
Isaac Sim Python
This is a mini app to run the Python samples.
- See Python Environment.
Isaac Sim Launch Scripts
Linux
Isaac Sim Launch Scripts that can be run from the Isaac Sim package on Linux#| Script | Description |
| --- | --- |
| isaac-sim.selector.sh | Isaac Sim Selector mini app |
| isaac-sim.sh | Isaac Sim full app |
| isaac-sim.streaming.sh | Isaac Sim headless full app with Isaac Sim WebRTC Streaming Client service |
| isaac-sim.fabric.sh | Isaac Sim full app with Fabric enabled |
| isaac-sim.xr.vr.sh | Isaac Sim base app with XR and VR enabled |
| jupyter_notebook.sh | Isaac Sim Jupyter Notebook executable |
| python.sh | Isaac Sim Python executable |
| setup_python_env.sh | Isaac Sim Python environment setup |
| setup_conda_env.sh | Isaac Sim Conda environment setup |
| clear_caches.sh | Script to clear local caches |
| post_install.sh | Script to be run once after install |
| warmup.sh | Script to warm up the shader cache |
Windows
Isaac Sim Launch Scripts that can be run from the Isaac Sim package on Windows#| Script | Description |
| --- | --- |
| isaac-sim.selector.bat | Isaac Sim Selector mini app |
| isaac-sim.bat | Isaac Sim full app |
| isaac-sim.streaming.bat | Isaac Sim headless full app with Isaac Sim WebRTC Streaming Client service |
| isaac-sim.fabric.bat | Isaac Sim full app with Fabric enabled |
| isaac-sim.xr.vr.bat | Isaac Sim base app with XR and VR enabled |
| python.bat | Isaac Sim Python executable |
| setup_python_env.bat | Isaac Sim Python environment setup |
| clear_caches.bat | Script to clear local caches |
| post_install.bat | Script to be run once after install |
| warmup.bat | Script to warm up the shader cache |
Docker (x86_64)
Isaac Sim Launch Scripts that can be run from the Isaac Sim container#| Script | Description |
| --- | --- |
| runapp.sh | Script to run Isaac Sim as a windowed app |
| runheadless.sh | Script to run Isaac Sim headless with Isaac Sim WebRTC Streaming Client service |
| jupyter_notebook.sh --allow-root | Isaac Sim Jupyter Notebook executable |
| python.sh | Isaac Sim Python executable |
| setup_python_env.sh | Isaac Sim Python environment setup |
| setup_conda_env.sh | Isaac Sim Conda environment setup |
| clear_caches.sh | Script to clear local caches |
| warmup.sh | Script to warm up the shader cache |
Docker (aarch64)
Isaac Sim Launch Scripts that can be run from the Isaac Sim container#| Script | Description |
| --- | --- |
| runapp.sh | Script to run Isaac Sim as a windowed app |
| python.sh | Isaac Sim Python executable |
| setup_python_env.sh | Isaac Sim Python environment setup |
| setup_conda_env.sh | Isaac Sim Conda environment setup |
| clear_caches.sh | Script to clear local caches |
| warmup.sh | Script to warm up the shader cache |
Flags that can be used to launch Isaac Sim#| Flag | Description |
| --- | --- |
| --/path/to/key=value | instruct to supersede configuration key with given value. |
| --clear-cache | Clear $cache folder before starting. |
| --clear-data | Clear $data folder before starting. |
| --disable-ext-startup | Do not startup any extensions, only load them. |
| --enable EXT_ID | Enable extension (short hand to add extension to enabled list). |
| --exec SCRIPT ARGS..., -e SCRIPT ARGS... | execute a console command on startup |
| --ext-folder PATH | Add extension folder to look extensions in. |
| --ext-path PATH | Add direct extension path (allows adding single extension). |
| --ext-precache-mode | Only resolve and download all extensions, exit right after. |
| --help, -h | this help message |
| --info, -v | show info log output in console |
| --list-exts | List all local extensions and quit. |
| --list-registry-exts | List all registry extensions and quit. |
| --merge-config, -m=<file> | merge configuration file. |
| --portable | Enable portable mode. Portable root defaults to ${kit} path. |
| --portable-root PATH | Enable portable mode and place data/cache/logs folders there. |
| --publish EXT_ID | Publish extension to the registry and quit. |
| --publish-overwrite | Allow overwriting extension in registry when publishing. |
| --reset-user | Do not load persistent settings from user.config file. |
| --unpublish EXT_ID | Unpublish extension from the registry and quit. |
| --update-exts | Look for latest versions in extension registry and update for all enabled extensions. |
| --verbose, -vv | show verbose log output in console |
| --wait-debugger, -d | Suspend execution and wait for debugger to attach. |
Differences Between Workstation And Docker
There are two methods to install Isaac Sim:
-
Workstation Installation is recommended for Workstation users.
-
Container Installation is recommended for remote headless servers or the Cloud using a Docker container.
Note
Here are the main differences between Workstation and Docker installations:
-
The Isaac Sim Docker container does not include Nucleus and will access assets directly from the Cloud by default.
-
The recommnded root folder of the workstation package is at ~/isaacsim or C:\isaacsim, while the root folder in the Docker container is /isaac-sim.
-
See Location for Isaac Sim app for differences in common paths.
Location for Isaac Sim app
Linux
~/isaacsim
Windows
C:\isaacsim
Docker
/isaac-sim
Location for Isaac Sim logs
Linux
~/.nvidia-omniverse/logs/Kit/Isaac-Sim
Windows
%userprofile%.nvidia-omniverse\logs\Kit\Isaac-Sim
Docker
/root/.nvidia-omniverse/logs/Kit/Isaac-Sim
Location for Isaac Sim shader cache
Linux
~/.cache/ov/Kit
Windows
%userprofile%\AppData\Local\ov\cache\Kit
Docker
/root/.cache/ov/Kit
Location for Isaac Sim configs
Linux
~/.local/share/ov/data/Kit/Isaac-Sim
Windows
%userprofile%\AppData\Local\ov\data\Kit\Isaac-Sim
Docker
/root/.local/share/ov/data/Kit/Isaac-Sim
Multi-GPU
Multi-GPU support and specific GPU settings can be activated via usual configurations methods, either via command line …
./isaac-sim.sh --/renderer/multiGpu/enabled=true
…or via kit configuration in python…
import carb.settings
settings = carb.settings.get_settings()
set different types into different keys
guideline: each extension puts settings in /ext/[ext name]/ and lists them extension.toml for discoverability
settings.set("/renderer/multiGPU/enabled", True)
Some useful settings include, but are not limited to….
-
/renderer/multiGpu/Enabled=trueenables multiple GPUs for rendering -
/renderer/multiGpu/autoEnable=trueenables multi GPU rendering if available -
/renderer/multiGpu/maxGpuCount=2sets the maximum number of GPUs to be allocated for rendering -
/renderer/activeGpu=0sets the active GPU according to nvidia-smi
Local Assets Packs
Isaac Sim Local Assets Packs are available to be used locally and in an air-gapped environment.
- Download the Isaac Sim Assets Complete Pack from the Latest Release section. The example below shows using aria2 to download the complete assets zip file.
Linux
sudo apt install aria2 cd ~/Downloads aria2c "https://download.isaacsim.omniverse.nvidia.com/isaac-sim-assets-complete-5.1.0.zip.001" aria2c "https://download.isaacsim.omniverse.nvidia.com/isaac-sim-assets-complete-5.1.0.zip.002" aria2c "https://download.isaacsim.omniverse.nvidia.com/isaac-sim-assets-complete-5.1.0.zip.003"
Windows
winget install --id=aria2.aria2 -e cd %USERPROFILE%/Downloads aria2c "https://download.isaacsim.omniverse.nvidia.com/isaac-sim-assets-complete-5.1.0.zip.001" aria2c "https://download.isaacsim.omniverse.nvidia.com/isaac-sim-assets-complete-5.1.0.zip.002" aria2c "https://download.isaacsim.omniverse.nvidia.com/isaac-sim-assets-complete-5.1.0.zip.003"
- Unzip packages to a folder.
Linux
mkdir ~/isaacsim_assets cd ~/Downloads cat isaac-sim-assets-complete-5.1.0.zip.001 isaac-sim-assets-complete-5.1.0.zip.002 isaac-sim-assets-complete-5.1.0.zip.003 > isaac-sim-assets-complete-5.1.0.zip unzip "isaac-sim-assets-complete-5.1.0.zip" -d ~/isaacsim_assets
Windows
mkdir C:\isaacsim_assets cd %USERPROFILE%/Downloads copy /b isaac-sim-assets-complete-5.1.0.zip.001 + isaac-sim-assets-complete-5.1.0.zip.002 + isaac-sim-assets-complete-5.1.0.zip.003 isaac-sim-assets-complete-5.1.0.zip tar -xvzf "isaac-sim-assets-complete-5.1.0.zip" -C C:\isaacsim_assets
Note
All three assets packs are required and they need to be combined into a single root folder (e.g. ~/isaacsim_assets/Assets/Isaac/5.1).
This root folder (~/isaacsim_assets/Assets/Isaac/5.1) must contain both the NVIDIA and Isaac folders.
- Follow the instructions to setup Isaac Sim, then edit the isaacsim.exp.base.kit file.
Linux
Edit the /home/<username>/isaacsim/apps/isaacsim.exp.base.kit file and add the settings below:
[settings] persistent.isaac.asset_root.default = "/home/<username>/isaacsim_assets/Assets/Isaac/5.1"
exts."isaacsim.gui.content_browser".folders = [ "/home/<username>/isaacsim_assets/Assets/Isaac/5.1/Isaac/Robots", "/home/<username>/isaacsim_assets/Assets/Isaac/5.1/Isaac/People", "/home/<username>/isaacsim_assets/Assets/Isaac/5.1/Isaac/IsaacLab", "/home/<username>/isaacsim_assets/Assets/Isaac/5.1/Isaac/Props", "/home/<username>/isaacsim_assets/Assets/Isaac/5.1/Isaac/Environments", "/home/<username>/isaacsim_assets/Assets/Isaac/5.1/Isaac/Materials", "/home/<username>/isaacsim_assets/Assets/Isaac/5.1/Isaac/Samples", "/home/<username>/isaacsim_assets/Assets/Isaac/5.1/Isaac/Sensors", ]
The lines below are optional. It is recommended to use the Content Browser instead.
exts."isaacsim.asset.browser".folders = [ "/home/<username>/isaacsim_assets/Assets/Isaac/5.1/Isaac/Robots", "/home/<username>/isaacsim_assets/Assets/Isaac/5.1/Isaac/People", "/home/<username>/isaacsim_assets/Assets/Isaac/5.1/Isaac/IsaacLab", "/home/<username>/isaacsim_assets/Assets/Isaac/5.1/Isaac/Props", "/home/<username>/isaacsim_assets/Assets/Isaac/5.1/Isaac/Environments", "/home/<username>/isaacsim_assets/Assets/Isaac/5.1/Isaac/Materials", "/home/<username>/isaacsim_assets/Assets/Isaac/5.1/Isaac/Samples", "/home/<username>/isaacsim_assets/Assets/Isaac/5.1/Isaac/Sensors", ]
Windows
Edit the C:/isaacsim/apps/isaacsim.exp.base.kit file and add the settings below:
[settings] persistent.isaac.asset_root.default = "C:/isaacsim_assets/Assets/Isaac/5.1"
exts."isaacsim.gui.content_browser".folders = [ "C:/isaacsim_assets/Assets/Isaac/5.1/Isaac/Robots", "C:/isaacsim_assets/Assets/Isaac/5.1/Isaac/People", "C:/isaacsim_assets/Assets/Isaac/5.1/Isaac/IsaacLab", "C:/isaacsim_assets/Assets/Isaac/5.1/Isaac/Props", "C:/isaacsim_assets/Assets/Isaac/5.1/Isaac/Environments", "C:/isaacsim_assets/Assets/Isaac/5.1/Isaac/Materials", "C:/isaacsim_assets/Assets/Isaac/5.1/Isaac/Samples", "C:/isaacsim_assets/Assets/Isaac/5.1/Isaac/Sensors", ]
The lines below are optional. It is recommended to use the Content Browser instead.
exts."isaacsim.asset.browser".folders = [ "C:/isaacsim_assets/Assets/Isaac/5.1/Isaac/Robots", "C:/isaacsim_assets/Assets/Isaac/5.1/Isaac/People", "C:/isaacsim_assets/Assets/Isaac/5.1/Isaac/IsaacLab", "C:/isaacsim_assets/Assets/Isaac/5.1/Isaac/Props", "C:/isaacsim_assets/Assets/Isaac/5.1/Isaac/Environments", "C:/isaacsim_assets/Assets/Isaac/5.1/Isaac/Materials", "C:/isaacsim_assets/Assets/Isaac/5.1/Isaac/Samples", "C:/isaacsim_assets/Assets/Isaac/5.1/Isaac/Sensors", ]
- Run Isaac Sim with the flag below to use the local assets.
Linux
./isaac-sim.sh --/persistent/isaac/asset_root/default="/home/<username>/isaacsim_assets/Assets/Isaac/5.1"
Windows
.\isaac-sim.bat --/persistent/isaac/asset_root/default="C:/isaacsim_assets/Assets/Isaac/5.1"
Note
-
The persistent.isaac.asset_root.default setting can either be set in the .kit settings file (Step 3) or via commandline (Step 4). The default is set to https://omniverse-content-production.s3-us-west-2.amazonaws.com/Assets/Isaac/5.1
-
The persistent.isaac.asset_root.default setting is used in the Python code that calls the get_assets_root_path_async
or get_assets_root_pathfunctions. -
The exts.”isaacsim.gui.content_browser”.folders setting is used in the Content Browser.
-
The exts.”isaacsim.asset.browser”.folders setting is used in the Isaac Sim Asset Browser. It is recommended to use the Content Browser instead
Assets Check
In the Isaac Sim app, to verify the access to the assets, go to the Isaac Sim Assets Browser tab. Then click the “Gear” icon and select Check Default Assets Root Path.
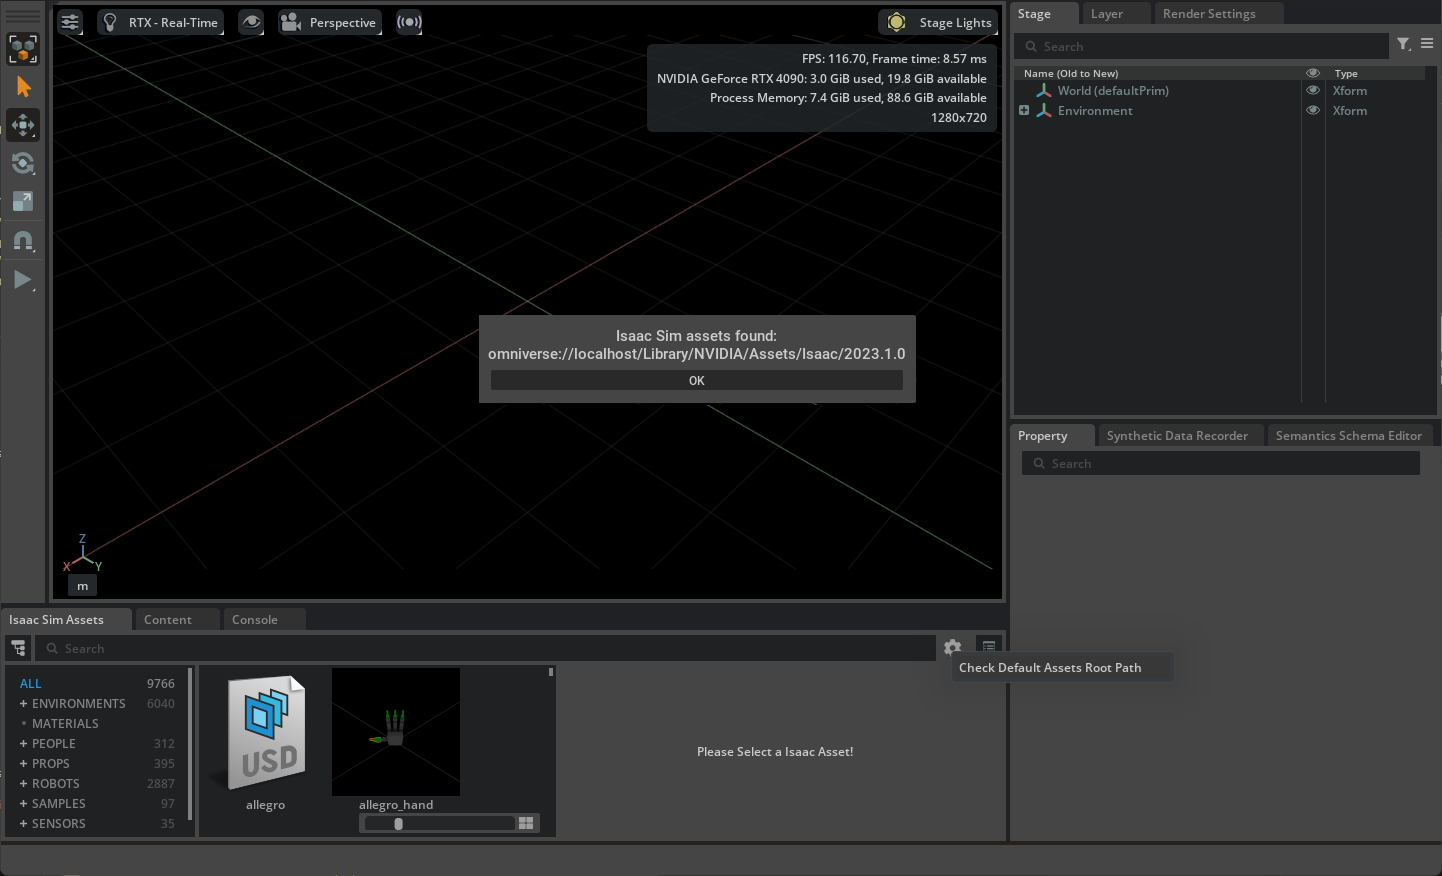 If manually downloading the assets pack from the previous section, the logs should show:
Linux
[139.213s] Checking for Isaac Sim Assets... [139.218s] Isaac Sim assets found: /home/<username>/isaacsim_assets/Assets/Isaac/5.1
Windows
[139.213s] Checking for Isaac Sim Assets... [139.218s] Isaac Sim assets found: C:\isaacsim_assets\Assets\Isaac\5.0
By default, the logs should show:
[139.213s] Checking for Isaac Sim Assets... [139.218s] Isaac Sim assets found: https://omniverse-content-production.s3-us-west-2.amazonaws.com/Assets/Isaac/5.1
Save Isaac Sim Configs on Local Disk
To keep Isaac Sim configuration and data persistent when running in a container, use the flags below when running the Docker container.
-v ~/docker/isaac-sim/cache/main:/isaac-sim/.cache:rw #For cache -v ~/docker/isaac-sim/cache/computecache:/isaac-sim/.nv/ComputeCache:rw #For cache -v ~/docker/isaac-sim/logs:/isaac-sim/.nvidia-omniverse/logs:rw #For log files -v ~/docker/isaac-sim/config:/isaac-sim/.nvidia-omniverse/config:rw #For config files -v ~/docker/isaac-sim/data:/isaac-sim/.local/share/ov/data:rw #For data -v ~/docker/isaac-sim/pkg:/isaac-sim/.local/share/ov/pkg:rw #For apps -u 1234:1234 #To set user permissions
$ sudo docker run --name isaac-sim --entrypoint bash -it --gpus all -e "ACCEPT_EULA=Y" --rm --network=host
-v ~/docker/isaac-sim/cache/main:/isaac-sim/.cache:rw
-v ~/docker/isaac-sim/cache/computecache:/isaac-sim/.nv/ComputeCache:rw
-v ~/docker/isaac-sim/logs:/isaac-sim/.nvidia-omniverse/logs:rw
-v ~/docker/isaac-sim/config:/isaac-sim/.nvidia-omniverse/config:rw
-v ~/docker/isaac-sim/data:/isaac-sim/.local/share/ov/data:rw
-v ~/docker/isaac-sim/pkg:/isaac-sim/.local/share/ov/pkg:rw
-u 1234:1234
nvcr.io/nvidia/isaac-sim:5.1.0
Note
These flags will use the use Home folder to save the Isaac Sim cache, logs, config and data.
Problem Connecting to Docker Container
To resolve some problems connecting to a Docker container, try using the –network=host flag when running the Docker container.
$ sudo docker run --gpus all -e "ACCEPT_EULA=Y" --rm --network=host nvcr.io/nvidia/isaac-sim:5.1.0
Note
This flag is needed to connect to a Nucleus server.
Reading the Logs in a Container
To ensure NVIDIA Isaac Sim is running in a container, you can read the logs:
- If the NVIDIA Isaac Sim container is on a remote machine, SSH into the Docker host using a terminal. Run this command from where your pem key folder is; replace the
<public_ip_address>with your instance or remote host IP address:
$ ssh -i "yourkey.pem" ubuntu@<public_ip_address>
- Access the running container as follows:
$ docker exec -it <container_id_or_name> bash $ cd /root/.nvidia-omniverse/logs/Kit/Isaac-Sim/<version_number>
Restarting the Container
The steps below are used to restart a headless container.
- SSH into the host machine or AWS instance running the NVIDIA Isaac Sim Container.
$ ssh -i "<ssh_key_name>.pem" ubuntu@<public_ip_address>
- List all running containers and find the container ID running NVIDIA Isaac Sim.
$ sudo docker ps CONTAINER ID IMAGE 823686a7036d nvcr.io/nvidia/isaac-sim...2021.2.1
- Restart the container.
$ sudo docker restart [CONTAINER ID]
- View the Docker logs.
$ sudo docker logs [CONTAINER ID]
Restart NVIDIA Isaac Sim inside Docker
If you want to restart NVIDIA Isaac Sim while keeping Docker running, you must start the Docker with Bash as the entrypoint so that you can manually start or stop NVIDIA Isaac Sim.
- Start the Docker with Bash, and start NVIDIA Isaac Sim manually.
$ sudo docker run -it --entrypoint bash --gpus all -e "ACCEPT_EULA=Y" --rm --network=host nvcr.io/nvidia/isaac-sim:5.1.0 $ ./runheadless.sh
-
Proceed to Isaac Sim WebRTC Streaming Client to live stream NVIDIA Isaac Sim remotely.
-
When you need to exit, in a separate terminal start an interactive bash session inside the same container that’s running the headless server and kill the NVIDIA Isaac Sim related processes.
$ docker exec -it <container_id> bash $ pkill omniverse-kit
- Restart NVIDIA Isaac Sim.
$ ./runheadless.sh
Save Docker Image
If you made significant changes inside the Docker, for example, installed ROS or other libraries, you may want to save the Docker image so that you can restart the Docker without having to reinstall everything.
- Find the container’s id and commit it.
$ docker ps $ docker commit <CONTAINER ID> <new docker name>
- To reload a specific docker:
$ docker run -it --entrypoint bash --gpus all -e "ACCEPT_EULA=Y" --rm --network=host -d <new Docker name>
Create a Cached Docker Image
Creating a local cached image of Isaac Sim will help improve the load times of running Isaac Sim in a container as well as having custom pre-installed dependencies.
- To create this cached image, first pull and run the latest Isaac Sim container from NGC.
$ docker pull nvcr.io/nvidia/isaac-sim:5.1.0
$ docker run --name isaac-sim --entrypoint bash -it --rm --gpus all --network=host
-e "ACCEPT_EULA=Y" -e "PRIVACY_CONSENT=Y"
nvcr.io/nvidia/isaac-sim:5.1.0
- Install any dependencies (e.g. ROS or other libraries) and warm up the shader cache.
$ ./python.sh -m pip install stable-baselines3 tensorboard $ ./python.sh standalone_examples/api/isaacsim.simulation_app/hello_world.py -v $ ./runheadless.sh -v --/app/quitAfter=1000
- Create the cached Docker image.
$ docker commit isaac-sim isaac-sim-cached
- Save the Docker image to a compressed archive to transfer it to another machine, if needed.
$ docker save isaac-sim-cached | gzip > isaac-sim-cached.tar.gz
- Load the compressed archive as a Docker image.
$ docker load -i isaac-sim-cached.tar.gz isaac-sim-cached
- Run this cached image.
$ docker run --name isaac-sim-cached --entrypoint bash -it --gpus all --rm --network=host
-e "ACCEPT_EULA=Y" -e "PRIVACY_CONSENT=Y"
isaac-sim-cached
Setting up Docker
Once you have Docker on Linux installed, follow the instructions at Post-installation steps for Linux to set it up so you would not need to use sudo to run a Docker container.
Mount a Folder to the Container
To add data from the host machine to a container, mounting a folder is needed.
$ sudo docker run --gpus all --rm -e "ACCEPT_EULA=Y" -v ~/docker/isaac-sim/documents:/root/Documents:rw nvcr.io/nvidia/isaac-sim:5.1.0
Note
Can now copy files to docker/isaac-sim/documents in your Home folder and it will show up in the Isaac Sim container at /root/Documents.
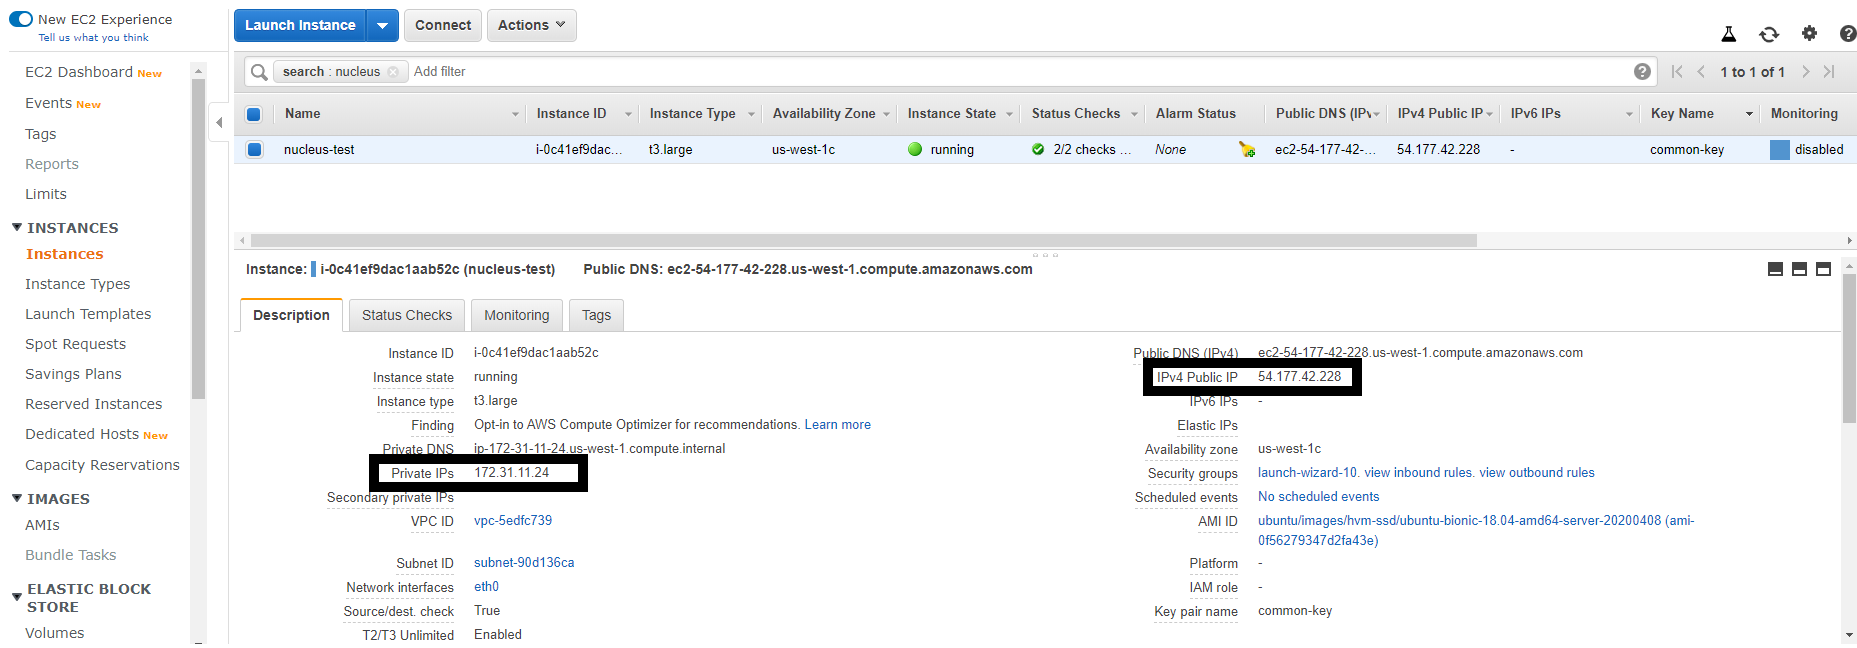
Getting IP Addresses of AWS EC2 Instance
To get the public and private IP addresses of an AWS EC2 instance, go to the Instances section of the EC2 Dashboard and select the instance. See the image below for an example of the Private and Public IPs:
 SSH into the AWS EC2 Instance
If you need to directly access an AWS EC2 instance that was created from the deployment above, run these steps to SSH into the instance:
$ ssh -i "<ssh_key_name>.pem" ubuntu@<public_ip_address>
Creating AWS Access Key
Create an AWS Access Key by following the instructions here:
Creating SSH Key
On Linux
- Run:
$ mkdir ~/.ssh $ chmod 700 ~/.ssh $ ssh-keygen -t rsa
-
Enter your passphrase twice.
-
Your public key is at .ssh/id_rsa.pub in your home folder and private key at .ssh/id_rsa.
On Windows
-
Download PuTTYgen.
-
Launch PuTTYgen, and click on “Generate a public/private key pair”.
-
Click on “Save public key” and name the file “${ssh_key_name}.pub”. This is your Public Key file.
-
From the “Conversions” menu, select “Export OpenSSH key” and name the file “${ssh_key_name}.pem”. This is your Private Key file.
-
Edit the properties of the “${ssh_key_name}.pem” file.
Go to security settings, click “Advanced”
Remove inheritance
Set current user as owner of the file and full permissions to only that user.
This is to prevent permission errors when trying to SSH into the instance
Assets on Nucleus
To access the Isaac Sim assets, access to the Internet is required.
Note
- Our Isaac Sim assets is also available in the main /NVIDIA/Assets/Isaac folder in every Nucleus server.
Setting the Default Nucleus Server
- To set the default Nucleus server when running natively, open the
user.config.jsonfile for editing and locate the following line:
"persistent": { "isaac": { "asset_root": { "default": "omniverse://localhost/NVIDIA/Assets/Isaac/5.1", } }, },
- Change
localhostto the IP address of the Nucleus server.
Note
- Location of
user.config.jsonfile:
Linux:
~/.local/share/ov/data/Kit/Isaac-Sim/5.0/user.config.json
- Windows:
C:\Users\{username}\AppData\Local\ov\data\Kit\Isaac-Sim\5.0\user.config.json
- The folder in the persistent/isaac/asset_root/default setting should contain both the Isaac and the NVIDIA folder.
- You could also run Isaac Sim with this flag:
--/persistent/isaac/asset_root/default="omniverse://<ip_address>/NVIDIA/Assets/Isaac/5.1"
- To set the default Nucleus server when running in Docker, use the flag
-e "OMNI_SERVER=omniverse://<ip_address>/NVIDIA/Assets/Isaac/5.1", where<ip_address>is the IP address of the Nucleus server.
$ sudo docker run --gpus all -e "ACCEPT_EULA=Y" -e "OMNI_SERVER=omniverse://<ip_address>/NVIDIA/Assets/Isaac/5.1" --rm --network=host nvcr.io/nvidia/isaac-sim:5.1.0
Setting the Default Username and Password for Connecting to the Nucleus Server
- Use the following commands to set the default credentials when running natively:
$ export OMNI_USER=<username> $ export OMNI_PASS=<password>
- To set the default credentials when running in Docker, use the flag
-e "OMNI_USER=<username>" -e "OMNI_PASS=<password>"(the default is “admin” for each).
$ sudo docker run --gpus all -e "ACCEPT_EULA=Y" -e "OMNI_USER=<username>" -e "OMNI_PASS=<password>" --rm --network=host nvcr.io/nvidia/isaac-sim:5.1.0
Links/Buttons:
- #
- Isaac Sim App Selector
- Isaac Sim WebRTC Streaming Client
- Python Environment
- Isaac Sim Launch Scripts
- Workstation Installation
- Container Installation
- Location for Isaac Sim app
- Local Assets Packs
- Latest Release
- setup Isaac Sim
- Content Browser
- Isaac Sim Asset Browser
- Post-installation steps for Linux
- Managing access keys (console)
- PuTTYgen