Conveyor Belt Utility — Isaac Sim Documentation
Title: Conveyor Belt Utility — Isaac Sim Documentation
Published Time: Tue, 21 Oct 2025 19:24:37 GMT
Markdown Content: Conveyor Belt Utility#
About#
The Conveyor Belt Utility Extension provides an utility to turn Rigid bodies into conveyors in NVIDIA Isaac Sim.
Usage#
To use the extension:
-
Select Window > Extensions.
-
Search for “conveyor”.
-
Select
isaacsim.asset.gen.conveyor.ui, and click on Enable. This will enable both the extension and it’s UI interface.
To auto-load this extension in the future, click on Autoload near the top of the isaacsim.asset.gen.conveyor.ui information pane of the extension manager.
To create a conveyor:
-
Select a rigid body or a mesh in the stage.
-
Go to the Create > Isaac Sim > Warehouse Items > Conveyor, to create a Omniverse OmniGraph node that will manage the conveyor speed and animation, with the following properties:
conveyorPrim: The target that will have the conveyor velocity applied. If it’s not a Rigid body it will be automatically configured as one, with default collision models. Only a single prim is allowed per ConveyorNode.
Animate Direction: Texture animation direction in the UV map.
Animate Scale: ratio between conveyor velocity and texture animation.
Animate Texture: flag to enable texture animation.
Curved: Flag to indicate a curved conveyor belt. When true, applies angular velocity instead of linear velocity. The velocity is applied along the specified Direction as a rotation axis. The Direction axis can be scaled to adjust the velocity, with values greater than 1 increasing the curvature radius and values less than 1 decreasing it. For example, setting Direction to (0, 0, 1) will rotate about the Z axis, a common use case.
Direction: Conveyor velocity direction in local coordinates.
Enabled: Flag to enable/disable the conveyor system.
Velocity: Conveyor velocity.
This Omniverse OmniGraph comes preconfigured with a variable for the velocity, so it can be changed by selecting the Omniverse OmniGraph prim directly. If you have multiple conveyors on a scene, you can also synchronize all velocities by selecting a single Omniverse OmniGraph’s variable in the read variable node (read_speed).
To emulate a conveyor animation, you can use a tiled texture, and set the Animate properties to have the texture translate in the same direction and velocity of the conveyor movement.
Alternatively, you can define your own Omniverse OmniGraph and manually add the Conveyor nodes to it, letting you have multiple conveyor nodes on the same Omniverse OmniGraph.
For convenience, multiple conveyor pieces are provided with the Isaac Sim assets package are available standalone on the Isaac Sim default assets package at Isaac/Props/Conveyors.
When authoring the Conveyor functionality for these assets, be sure to have the Belt or Rollers prim selected, as these are the prims that contains the meshes for the conveyor elements.
Digital Twin Library Conveyor System Generator#
To facilitate the creation of Digital Twins, a utility to generate conveyor systems is provided at Tools > Conveyor Track Builder. This utility ships with our Digital Twin assets pack for conveyors, but you can use your own dataset, provided that you change the configuration file.
If an item selected on the screen is a component of the conveyor dataset, it will try to connect to one of the conveyor endpoints, as defined by the configuration, otherwise it will use the selection as a parent for the insertion of the new piece.
 The configurator is made with loose integration with the assets, allowing flexibility when creating the conveyor system, with a minimal set of rules to facilitate the creation. This may cause the need for some minimal post-processing after creating the system, being a compromise so it won’t block you from fully customizing their track after it’s modeled.
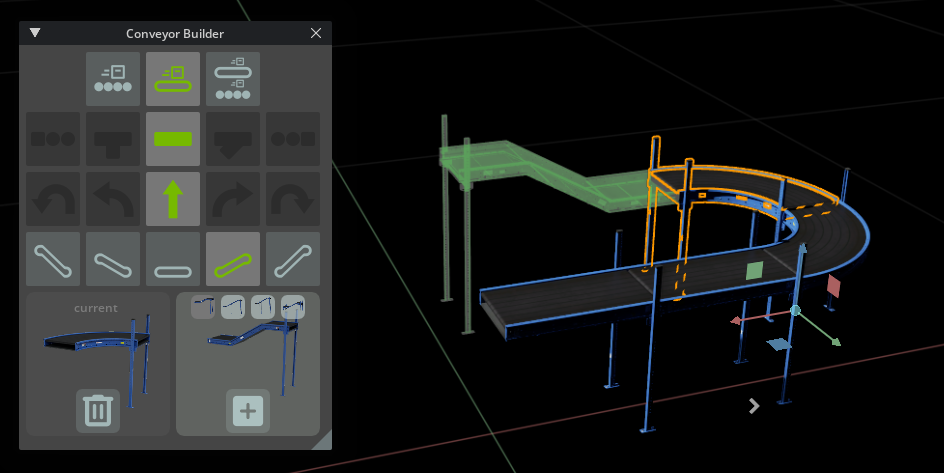
User Interface#

| Ref # | Option | Result |
|---|---|---|
| 1 | Conveyor Style | Styles of Conveyor Available, Can be Roller, Belt, or Dual |
| 2 | Track Type | Track Types, Can be Start, T-style split, straight, Y-style split, end. |
| 3 | Curvature | Track Curvature, Can be None, Half (usually for 90 degrees), or Full (usually for 180 degrees turn), to the left or right. |
| 4 | Elevation | Track Elevation. Can be one-level or two-levels up from the entry point, either Up or Down. |
| 5 | Selected Track | Shows the current selected track on screen, its endpoints, and the Delete button to remove the current track from the system. |
| 6 | New Track | Shows the piece marked for addition on the system. Lets you choose the input point, the track variants available on the dataset, and in some cases, gives the option to use a mirror of the piece |
| 7 | Track Variants | Shows the additional variants for the filter selection |
| 8 | Selected Endpoint | Each option relates to one of the track endpoints. Endpoints already used will not show on the UI, unless all endpoints are already connected. |
| 9 | Mirror | Mirrors the selected piece on the primary belt direction |
Dataset#
The dataset is a collection of USD files used for the system creation. Each USD file must:
-
Have a Default Prim defined. That prim and all its children is what will be loaded when your asset is loaded as a reference.
-
Have the default prim with an empty transform (Translate and rotation components set to zero).
-
Have each conveyor track defined as an Xform Prim, with all visual/collision meshes parented by this Prim.
-
Have the entry point of the tracks at the Origin, with the track aligned with the X-axis, with the origin at the middle of the track on the Y axis.
-
Have the anchor points defined at Height zero (Z = 0), at the end of the track, aligned to the middle of the track in the Y axis. The X axis must be aligned with the base direction of the Track.
-
Have individual materials defined for each track. Meshes that are part of the same conveyor base Prim can share materials.
-
Be contained on the same base folder. They can have references to assets outside this base folder.
Accompanying the assets dataset, there is a JSON file that contains the metadata needed to the UI workflow, and to configure the conveyor physics, if the original assets don’t have the conveyor physics already embedded.
1{ 2"assets": { 3 "ConveyorBelt_A01": { # File name of the asset, without the extension. 4 "style": "DUAL", # Conveyor style, can be ROLLER, BELT, or DUAL 5 "start_level": 0, # Conveyor level for the track, can be any positive number 6 "angle": "HALF", # Conveyor turn type, can be NONE, HALF, FULL" 7 "curvature": "SMALL", # Conveyor radius of curvature, can be NONE, SMALL, MEDIUM, LARGE. Currently not used by the filter. 8 "ramp": "FLAT", # Ramp level. How many levels it increases or decreases start level, can be FLAT, ONE, TWO, THREE, FOUR. 9 "type": "STRAIGHT", # Track Type, can be START, STRAIGHT (used for all single track types, including curves and ramps), Y_MERGE, T_MERGE, FORK_MERGE, END. 10 "anchors": [ # All Prim children paths that correspond to endpoints on the asset. 11 "", # This is the root of the conveyor, which is also an endpoint. 12 "/Anchorpoint" # For all the other anchors, keep the trailing / on the child prim name 13 ], 14 "conveyor_nodes": { # All Child Prims to be configured as conveyors using the OmniGraph node. Each track should have its own configuration (in the case of merge and splits), even if it's of the same style 15 "Rollers": { 16 "animate_scale": 0.01, 17 "animate_direction": [ 18 0.0, 19 1.0 20 ], 21 "direction": [ 22 1.0, 23 0.0, 24 -37.0 25 ], 26 "curved": true 27 }, 28 "Belt": { 29 "animate_scale": 0.5, 30 "animate_direction": [ 31 1.0, 32 0.0 33 ], 34 "direction": [ 35 0, 36 0.0, 37 -37.0 38 ], 39 "curved": true 40 } 41 } 42 } 43}
Note
Strict JSON types do not have comments, the snippet above have them included to explain the data. If you copy it, remember to remove the comments otherwise it will fail the extension. For a full version of the JSON file, check the data folder in the extension.
Changing the Configuration and Dataset Source#
To change the dataset to be used, and the configuration file with your own:
-
Go to Edit>Preferences>Conveyor Builder.
-
Choose the source path to be used in either. The assets must be in the direct folder listed in the Conveyor Assets Location.
If you want to restore the original settings, click Reset To Default.
Improving Load Time#
By default, the tool uses the cloud-based assets folder. Because the tool only downloads the assets from the cloud the first time they are used, it can result in long wait times while the asset is loaded. To reduce this time, you can download the assets locally and update your assets location to the local path.
Available Tracks#


Links/Buttons: